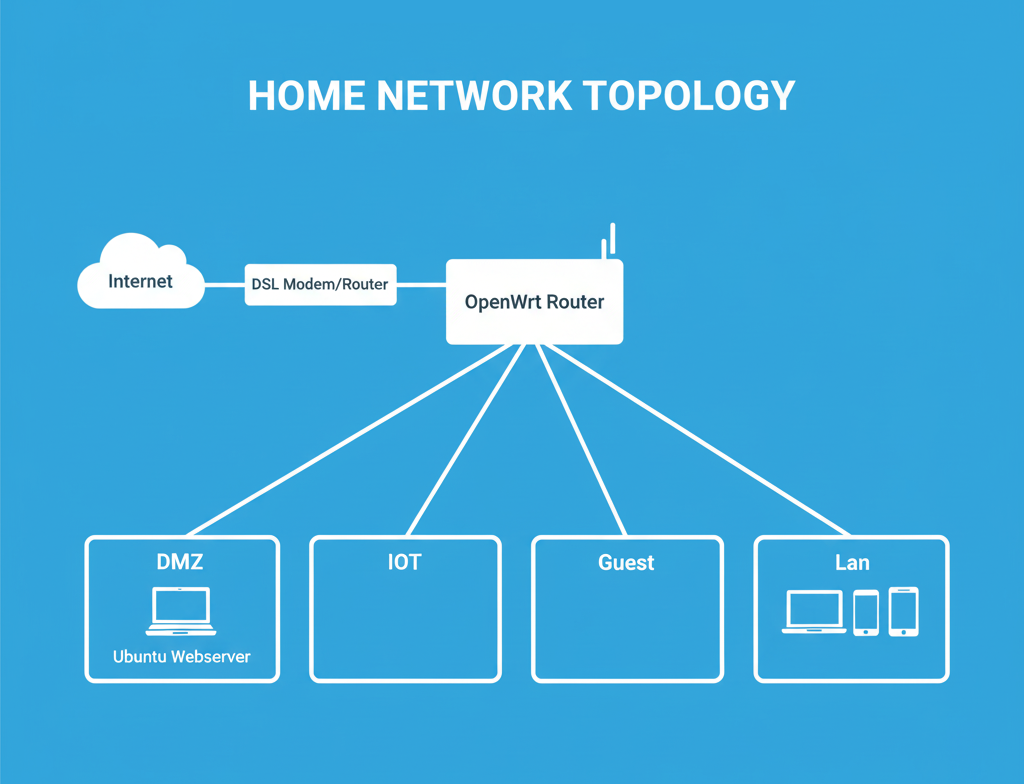
Home Network Lab My goal in this project was to make an old laptop that I have converted into a webserver isolated from my personal network, but with access to and from the internet. Secondary goals were, in addition, to create likewise isolated networks for my IoT devices and my guest network. Part of this project overlaps with my WordPress Website Development project, so I suggest you check out that project as well. Github Creation of separate network interfaces for DMZ, IOT & GUEST Creation of interface DMZ-Intf, which will be using exclusively port LAN 4 on my router In my case I decided to isolate physically the port LAN 4 on my router, to connect to that port my webserver. I achieved that by finding the device that was bridging the lan ports on my router and removing from that device port LAN 4. I then activated LAN 4 as a separate network device and created an interface named DMZ-Intf, that was using only port LAN 4. I gave the static address 192.168.100.1/24 to interface DMZ-Intf and enabled the DHCP server option. Creation of interface IOT-Intf I created a network interface named IOT-Intf, which I decided not to connect to any device, as this will happen later when I create a 2.4 GHz wireless network and attach it to this interface. I gave the static address 172.16.100.1/24 to the interface and enabled the DHCP server option. Creation of interface GUEST-Intf I created a network interface named GUEST-Intf, which I decided not to connect to any device, as this will happen later when I create a 5 GHz wireless network and attach it to this interface. I gave the static address 10.20.100.1/24 to the interface and enabled the DHCP server option. Creation of the DMZ, IOT & GUEST Firewall Zones Creation of the DMZ Firewall Zone We create a new Firewall Zone named DMZ and we set DMZ to accept input traffic from the internet, because we want it to be globally accessible, to accept output traffic to the internet, because we want the webserver to be able to connect to the internet to update itself, and forward traffic to reject, because we don’t want it connecting to any other network. We enable the masquerading option, because we want our webserver to be accessible through our public IP address and connect it to the DMZ-Intf interface. We set allow forward from source zone LAN, because we want it to be accessible from the devices in the LAN network and allow forward to destination zone WAN, because we want it to be capable of accessing the internet. Creation of the IOT Firewall Zone We create a new Firewall Zone named IOT and we set IOT to reject input traffic from the internet, because we don’t want it to be accessible through the internet, to accept output traffic to the internet, so that the IoT devices are able to connect to the internet to update themselves, and forward traffic to reject, because we don’t want it connecting to any other network. We connect it to the IOT-Intf interface and we set allow forward from source zone LAN, because we want it to be accessible from the devices in the LAN network. Creation of the GUEST Firewall Zone We create a new Firewall Zone named GUEST and we set GUEST to reject input traffic from the internet, because we don’t want it to be accessible through the internet, to accept output traffic to the internet, so that the guest devices are able to connect to the internet, and forward traffic to reject, because we don’t want it connecting to any other network. We connect it to the GUEST-Intf interface and we set allow forward from source zone LAN, because we want it to be accessible from the devices in the LAN network and allow forward to destination zone WAN, because we want it to be capable of accessing the internet. Creation of DHCP & DNS traffic rules for zones IOT & GUEST We create two new rules that accept input from the IOT & GUEST zones respectively to the router on ports 53, 67 and 68. We do that so that the DHCP and DNS services on the router can assign IP addresses without any issues to the devices in the IOT and GUEST zones. Creation of port forwarding rules to the DMZ zone We create two new port forwarding rules named HTTP and HTTPS respectively, that forward incoming TCP traffic to the router on external ports 80 and 443, to DMZ on internal ports 80 and 443 respectively. Creation of two new wireless networks IOT & GUEST We create a new wireless 2.4 GHz network with SSID IOT and we assign it to the IOT-Intf. Then we create a new wireless 5 GHz network with SSID GUEST and we assign it to the GUEST-Intf. Setup of a DDNS (Dynamic DNS) service that will always point to our router and connection to a domain name If we have already purchased our own domain name, we want it to always point to our webserver, even when our ISP changes our IP. That’s why we need a DDNS service. Personally, I have chosen the No-IP DDNS, because it’s free for only one domain and it just requires that you login once every 30 days to keep it active. The way it works is you first download and install the relevant DDNS module for your router, so that the DDNS service can connect to your router to get its IP every time it changes. Then you register at noip.com, create your DDNS domain out of the options they provide, copy the username and passkey and paste them to the DDNS module that you installed earlier. The DDNS service creates an A record in their DNS pointing to your IP, regardless of how often it changes, changing the IP address where the A record is pointing accordingly. In order for your